How to Get Easy Skins in Warrior Saga
Overview [ ]
In Warrior Cats: Ultimate Edition, the customization possibilities are endless! Character Customization in WCUE is the place players go to create their Warrior Cat and use it to roleplay with afterwards. With hundreds of color, fur, and pattern combinations, a player will never run out of fresh ideas for new cats! (Note: Although there are many things that are free to use, some features for customization are only available through gamepasses.). When a player loads into the game, the first thing a player see is the Character Customization Screen.

Please note that this page does not include character customization related to the unconfirmed new model.
Usage [ ]
After entering WCUE, a player will go through two loading screens. The first thing that shows up once loaded in is the Character Customization screen. When their customization is complete, press finish to enter the game and start playing.
Customization [ ]
Colors and Tools [ ]
There are many colors to make a cat with, including black, gray, white, brown, etc. Combine colors to make a completely unique Warrior, or stick to neutral, for a more toned-back and realistic cat.
Simple [ ]
On Simple customization, a player is able to color their cat according to its primary pelt, secondary pelt, markings, secondary markings, eyes, skin, and more. Choose from many colors for a more basic cat using the Simple customization. You can enable more colors by opening the settings, scrolling all the way down, and pressing the button under "Full palette for simple coloring".
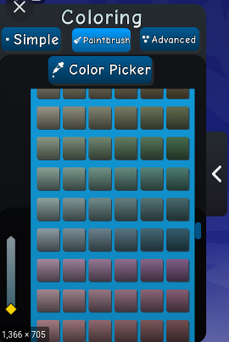
Paintbrush
Paintbrush [ ]
If a players are looking to make a detailed cat, Paintbrush is the place to go. When a player feels limited to their cat's creative potential, a player can use the paintbrush to pick any color, in any shade, on any part of the body. WCUE divides sections of the cat model, so players can put different colors on the tip of the tail, the neck, the second half of the body, one ear, etc. Just click on the area on a cat that is highlighted, and it will change to the color selected. If a player can't find the color that they are looking for, use the sliding bar on the left of the color palette to change the shade of their selected color. The player can also use the paintbrush to put two different colors for the eyes, if the player has the heterochromia gamepass. The Paintbrush is very helpful for when a player wants a detailed cat, and a wide variety of different colors.
Advanced Customization
Advanced [ ]
Advanced customization colors their cat according the parts of the body that the tool divides it in. For instance, when a player selects tail, a player can pick colors for segment one of the tail, segment two, and so on. Or if a player want to color the bottom of the rear left leg a different color from the front right, a player can. Advanced customization is helpful for when using the paintbrush isn't really their thing, but a player still wants a detailed morph.
Color Palettes [ ]
Colors for the body of their cat come in so many choices. Just a few include shades of brown, grey, black, white, red/russet, tan, gray/blue, ginger, and more. Colors that are unable to be used on the body of their cat are used for the eyes, skin, whiskers and chains, accessories, etc. There is a substantial amount of eye colors that can be used without gamepasses, like green, blue, and amber. Extra eye colors can be purchased. Skin colors (ears, nose, paw pads) come in grays and pinks. Accessories come in bright and dull colors, such as blue, pink, purple, green, orange, red, and so on.
Misc. [ ]
The Close Eyes button allows a player to close their cat's eyes. This is helpful for coloring the eyelids, or seeing what the cat looks like with its eyes closed. The Reset Cat button will delete the current cat and reset it to the default white and grey with blue eyes. It's an easy way to restart a morph if a player isn't happy with how it looks. The Codes button was added in a recent update. It allows a player to enter codes that WCUE adds for limited editions items. As of now, there are no codes available (See codes). All of these buttons are found below the size bar.

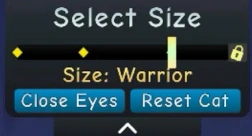
Size Bar
Size [ ]
There are five different size options available in WCUE in Character Customization. Choose from a kit, apprentice, a young warrior, and warrior. The fifth choice is large warrior, which comes in a gamepass. Use the bar at the top of the screen to select their desired size or age.
The kit, being the smallest, is perfect for when a player want to be a Clan, rogue, or kittypet kit. It is also used for roleplaying as small non-cats, such as pups, mice, rabbits, etc. The apprentice, which is second smallest, is used in the Clans as, of course, an apprentice. For rogues and kittypets, they are often seen as older kits. The a playerng warrior, which is third smallest, is normally used in the Clans as an older apprentice and new warrior, or smaller full-grown cats. Rogues and kittypets using a warrior are mostly middle-aged, or miniature cats. The warrior, being the biggest (aside from large warrior) speaks for itself in the Clans. In rogues or kittypets, it is used as full-grown cats. Lastly, the large warrior is used for larger cats in the Clans and as rogues. If a player enjoy roleplaying as a non-cat, all of these sizes can be used for a lot of different animals, such as foxes, wolves, dogs, badgers, and others, ranging in different sizes.
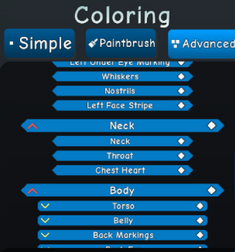
Accessories and Features [ ]
Categories
The Accessories tool is where a player can add features to their cat. This device is what allows a player to add all the finishing touches on their morph. Customization under Accessories is grouped into categories, like Ears, Tail, Fur, Torso, Eyes, Head, etc. Click on the category a player want to add to, and there are accessories and elements to make their cat interesting and unique! For example, if a player click the "Torso" category, there is a list of features a player can add to their morph, like stripes, spots, and other interesting markings. Some ears, markings, and other things are only available through gamepasses, but there is a multitude of things a player can use without them. The Accessories tool is one of the most important of the entire Character customization, because it's when a player really start to see their morph come alive. Ear and neck accessories include collars, flowers, chains, etc, and most of them have to be purchased with gamepasses. So far, all the Outfits also have to be purchased.
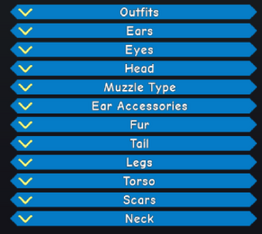
Categories [ ]
Categories to choose from include the following:
Ears, Eyes, Tail, Legs, Head, Torso, Scars, Muzzle Types, Ear Accessories, Neck, Fur, and cat size.
For a list of every marking and clothing accessory available, visit Markings and Accessories.

Load and Save Slots
Load and Save Slots [ ]
The final step in making their morph is saving it. In Character Customization, a player are able to switch between "Edit Morph" and "Load/Save." When first starting, the game gives a player 12 save slots. However, this can be upgraded with Extra Save Slots or VIP gamepass. The max amount of save slots can go up to 64. When loaded into the game, a player are automatically put onto "Edit Morph" which allows a player to edit their cat or make new ones. To save or load a morph, go to the top of the screen and switch to "Load/Save." Here, a player can save their current morph, or load a preexisting one. On April 4th, 2022, the developers added four more save slots to the game for people with VIP, and an extra save slot for everyone, due to people protecting their logo on r/place.
[ ]
Tips and Tricks [ ]
Stuck on where to start? Consider these tips!
- If a player would like a realistic morph, don't add too many loud colors or patterns. Stick to a neutral color scheme, and markings that go with the cat "type" that a player are making.
- Make the colors and markings cohesive. Do make the pattern a similar color to that of the body (brown body, light brown stripes; white body, gray spots). Don't make the patterns pop out too much (White body, pure black stripes; gray body, red rosettes).
- Add just enough fur to make the morph interesting, but don't overdo it.
- If a player are making a non-cat (e.g. fox), make the morph fairly realistic. Don't just color it red and white, and put fur all over it. Make sure to put effort into all the morphs a player make!
- If a player isn't happy with the way their morph turns out, try taking a different approach. See which colors and markings match the style a player is going for. The best way to see what fits their morph the best is trial and error.
Upcoming Updates [ ]
- Single body stripe runs through torso and upper belly.
Source: https://warrior-cats-ultimate-edition-wcue.fandom.com/wiki/Character_Customization
Post a Comment for "How to Get Easy Skins in Warrior Saga"